Data cartridge#
See also
Latest version of all firmware and flashers:
Background#
The P2000T comes with a cassette deck to load and write BASIC programs from and to. For a lot of P2000T machines, this cassette deck is unfortunately defect and it is nearly impossible to repair these. Even if the tape deck is fully working, loading a BASIC from the cassette deck is relatively slow. The data cartridge as described here aims to solve this.
One way to retrieve data from external sources is via the I/O port of the
Z80 processor. The P2000T already uses many of the 256 available I/O ports
to interface with its peripherals such as the keyboard and the cassette deck, yet
I/O ports 0x40-0x4F and 0x60-0x6F remain available. We can get access
the I/O port of the Z80 processor via SLOT2. This slot exposes address pins
A0-A7 and data pins D0-D7 as well as some additional logics pins. The
data cartridge as described here is a SLOT2 cartridge that interfaces
with these pins. It not only offers data to the P2000T, it is also able to store
data provided by the P2000T.
Hardware design#
The data cartridge hosts one (internal) 128kb ROM chip, a 32kb static RAM chip
and has a ZIF socket for another (external) 512kb ROM chip. The internal
ROM chip is a SST39SF010 in a PLCC32 package. The external ROM chip is a
SST39SF040 chip in a DIP32 package.
Since SLOT2 only offers 8 address pins and 8 data pins, we make use of a set
of write-only registers to set the address for these chips. Two 74HC273 chips
are used to store the lower and upper byte of the address (A0-A7 and A8-A15)
and one additional 74HC173 is used to store the high bits of the address
(A16-A18). This register will be called the bank register as it effectively
does bank switching. For the external ROM chip, all these address lines will be used.
The RAM chip and the internal ROM chip will ignore all lines corresponding to
address spaces exceeding their storage capacity.
An overview how the I/O ports are used to interface with the chips is provided in the table below.
Port number |
Function |
R/W |
|---|---|---|
|
Lower address byte |
W |
|
Upper address byte |
W |
|
Internal ROM chip |
R/W |
|
Bank register |
W |
|
RAM chip |
R/W |
|
External ROM chip |
R/W |
|
LEDs |
W |
|
not used |
N/A |
A schematic of the data cartridge is provided in Figure 23b.

Fig. 23 Schematic of the data cartridge. Click here to download the schematic.#
Functionality#
The programs stored on the cassette are typically BASIC programs and to run these programs, we need a BASIC environment as available via the corresponding SLOT1 cartridge (e.g. BASIC-NL or similar). This BASIC cartridge was never designed to operate with our custom SLOT2 cartridge and as such, we need to make a few alterations to this cartridge to get it to work. The BASIC cartridge luckily has a bit of free space left (not much though) and we use this free space to insert a few routines that are able to load programs from the internal ROM chip on the data cartridge to the internal memory on the P2000T.
The set of routines used to copy a program from the internal ROM on the data cartridge is termed the bootloader. The bootloader not only copies the data to the internal memory of the P2000T, it also starts this program. The bootloader together with the BASIC cartridge is termed the BASICBOOTSTRAP.
The program that is being copied is termed the launcher. The firmware interfaces with the ROM chip in the ZIF socket and is able to retrieve (BASIC) programs from that chip and load these into memory and run these.
The launcher can be updated using another SLOT1 cartridge termed the firmware-flasher.
In Figure 24, a schematic overview is provided how the datacartridge functions and which operations it performs. This is further elaborated upon below.
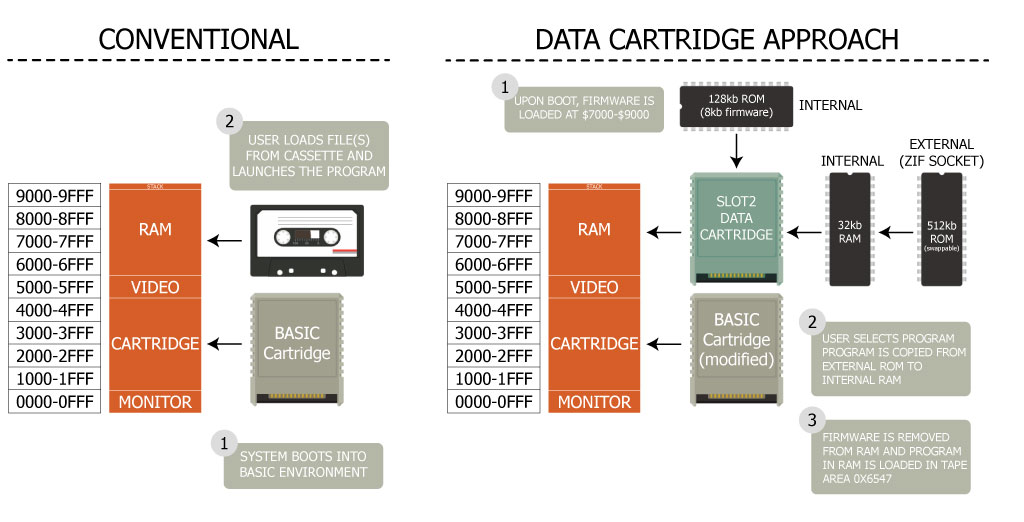
Fig. 24 Simplified overview of the P2000T data cartridge#
Upon boot, the modified BASIC cartridge sets up the BASIC environment after which the bootloader routines are executed which copies the launcher over from the internal ROM chip on the datacartridge to the internal memory of the P2000T.
The bootloader executes the launcher routine. The launcher routine will aim to interface with the chip in the ZIF socket of the datacartridge and look for any programs stored there. All programs found will be listed and the user can select which program they want to run.
Upon selection, the launcher will first copy the program from the external ROM chip to the internal RAM chip on the datacartridge. Next, the firmware will exit and release control over to the bootloader. The bootloader will now copy the program from the internal RAM chip to the internal memory of the P2000T and calls the BASIC
RUNroutine which will start the program.
At this point, BASIC will continue running in the normal fashion. Returning to the launcher interface requires rebooting of the P2000T.
Preparation#
To get working with the datacartridge, one needs the following tools
A chip flasher such as the PICO SST39SF0x0 programmer
A ZIF cartridge or similar writeable SLOT1 cartridge
Three
SST39SF0x0type of ROM chips. One for storing the SLOT1 cartridges, one for storing the launcher and one for storing the BASIC programs.
Creating the SLOT1 cartridges#
First, we need to construct two SLOT1 cartridges, being the modified BASIC cartridge and the flasher. The BIN files for these two cartridges can be obtained via the links below:
Upload these two BIN files to different ROM slots on the ZIF cartridge. A detailed guide on the procedure can be found on the page describing the ZIF cartridge.
Tip
Make a note which slot you have used for which cartridge file.
Caution
The SD-card cartridge also uses a modified BASICNL ROM, however this modified BASICNL ROM is a different one and the two types are not interchangeable.
Installing the launcher#
Once you have created the two SLOT1 cartridges, we need to install the latest
version of the launcher onto the datacartridge. Download the latest version
of the launcher via the link below and copy the contents of this file to
a SST39SF0x0 chip. Copying the launcher to the chip is similar to the description
as shown above for building the SLOT1 cartridges, yet make sure you copy the
file to the first ROM slot.
Caution
It is highly recommended to use a dedicated SST39SF0x0 chip for this to avoid overwriting any previous data.
The flasher assumes the launcher software is positioned at the start of the ROM chip. Make sure you have flashed the launcher to the first SLOT on the ROM.
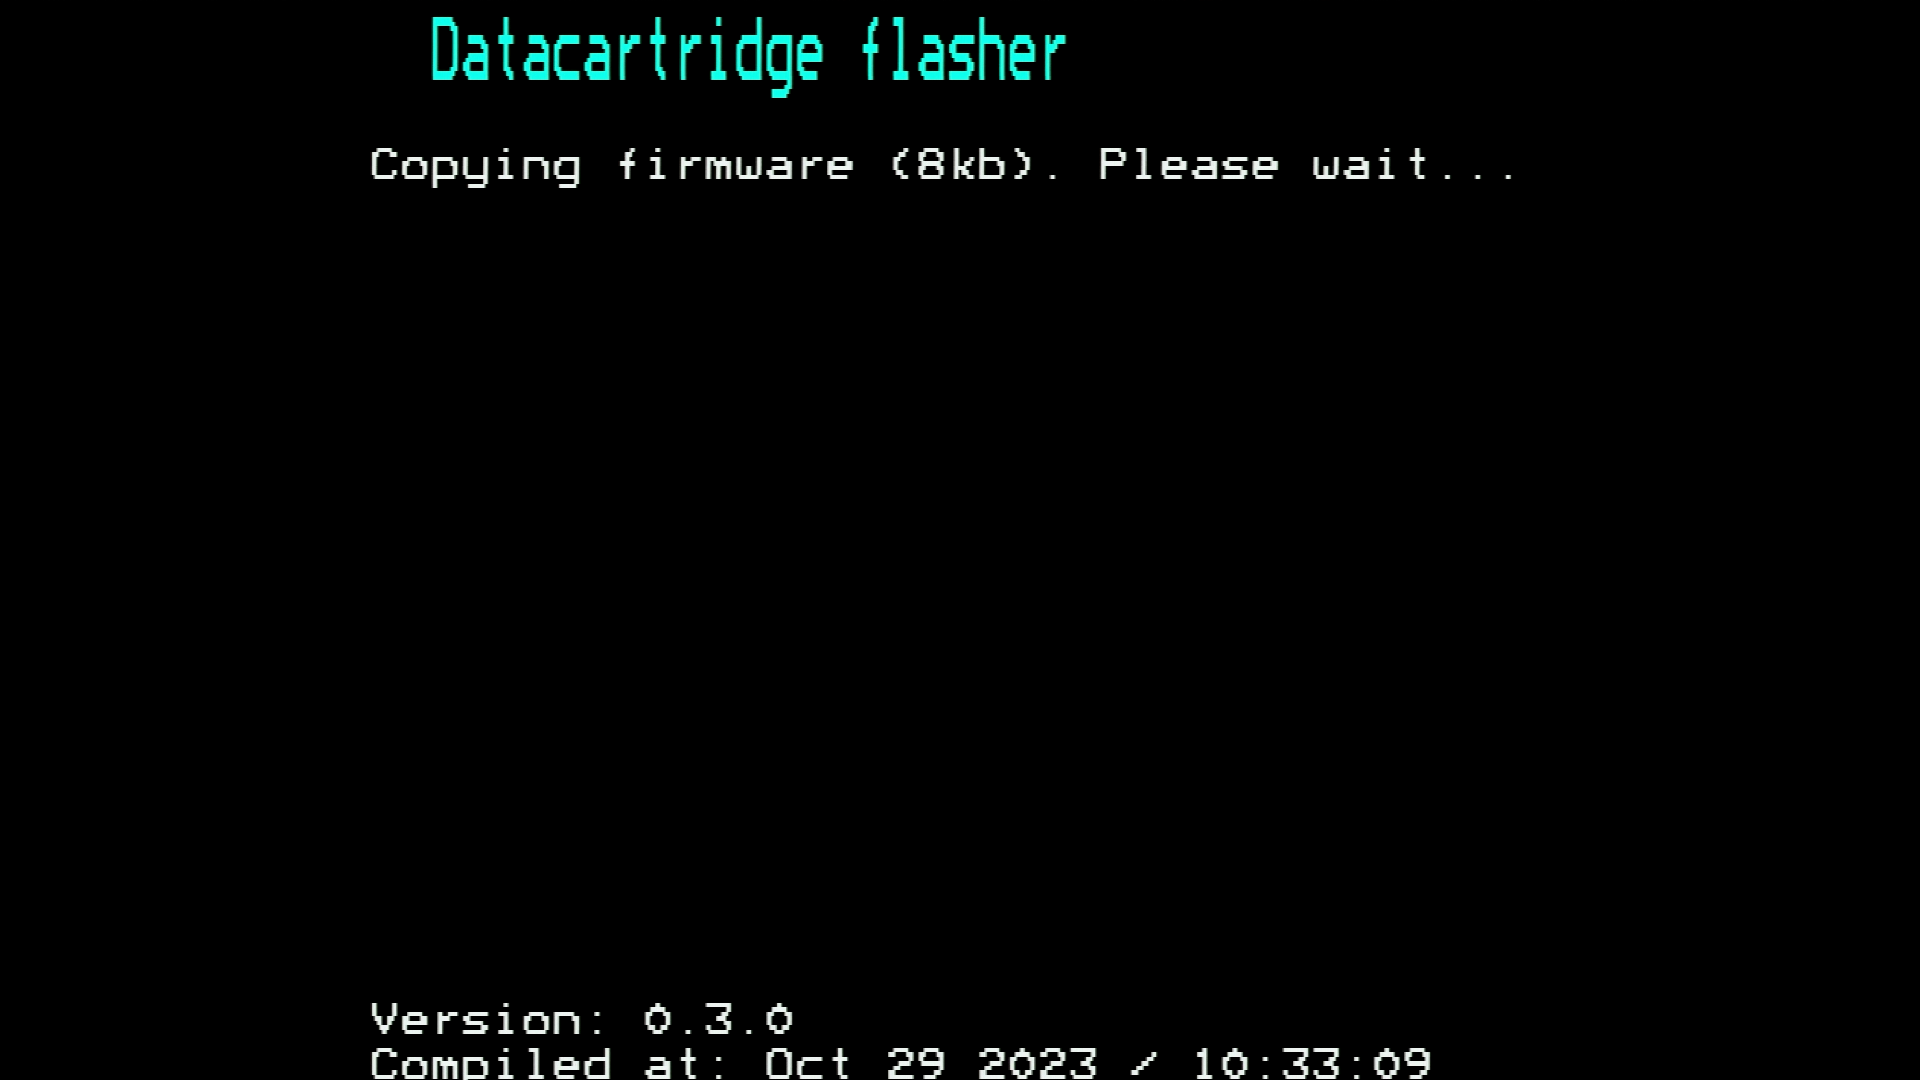
Insert the ROM chip with the launcher into the ZIF socket of the datacartridge. Insert the datacartridge into SLOT2 and the flasher SLOT1 cartridge into SLOT1. Turn on your P2000T and you should be greeted with the interface screen of the flasher as shown in Figure 25a. Hit any key to start the flashing procedure.
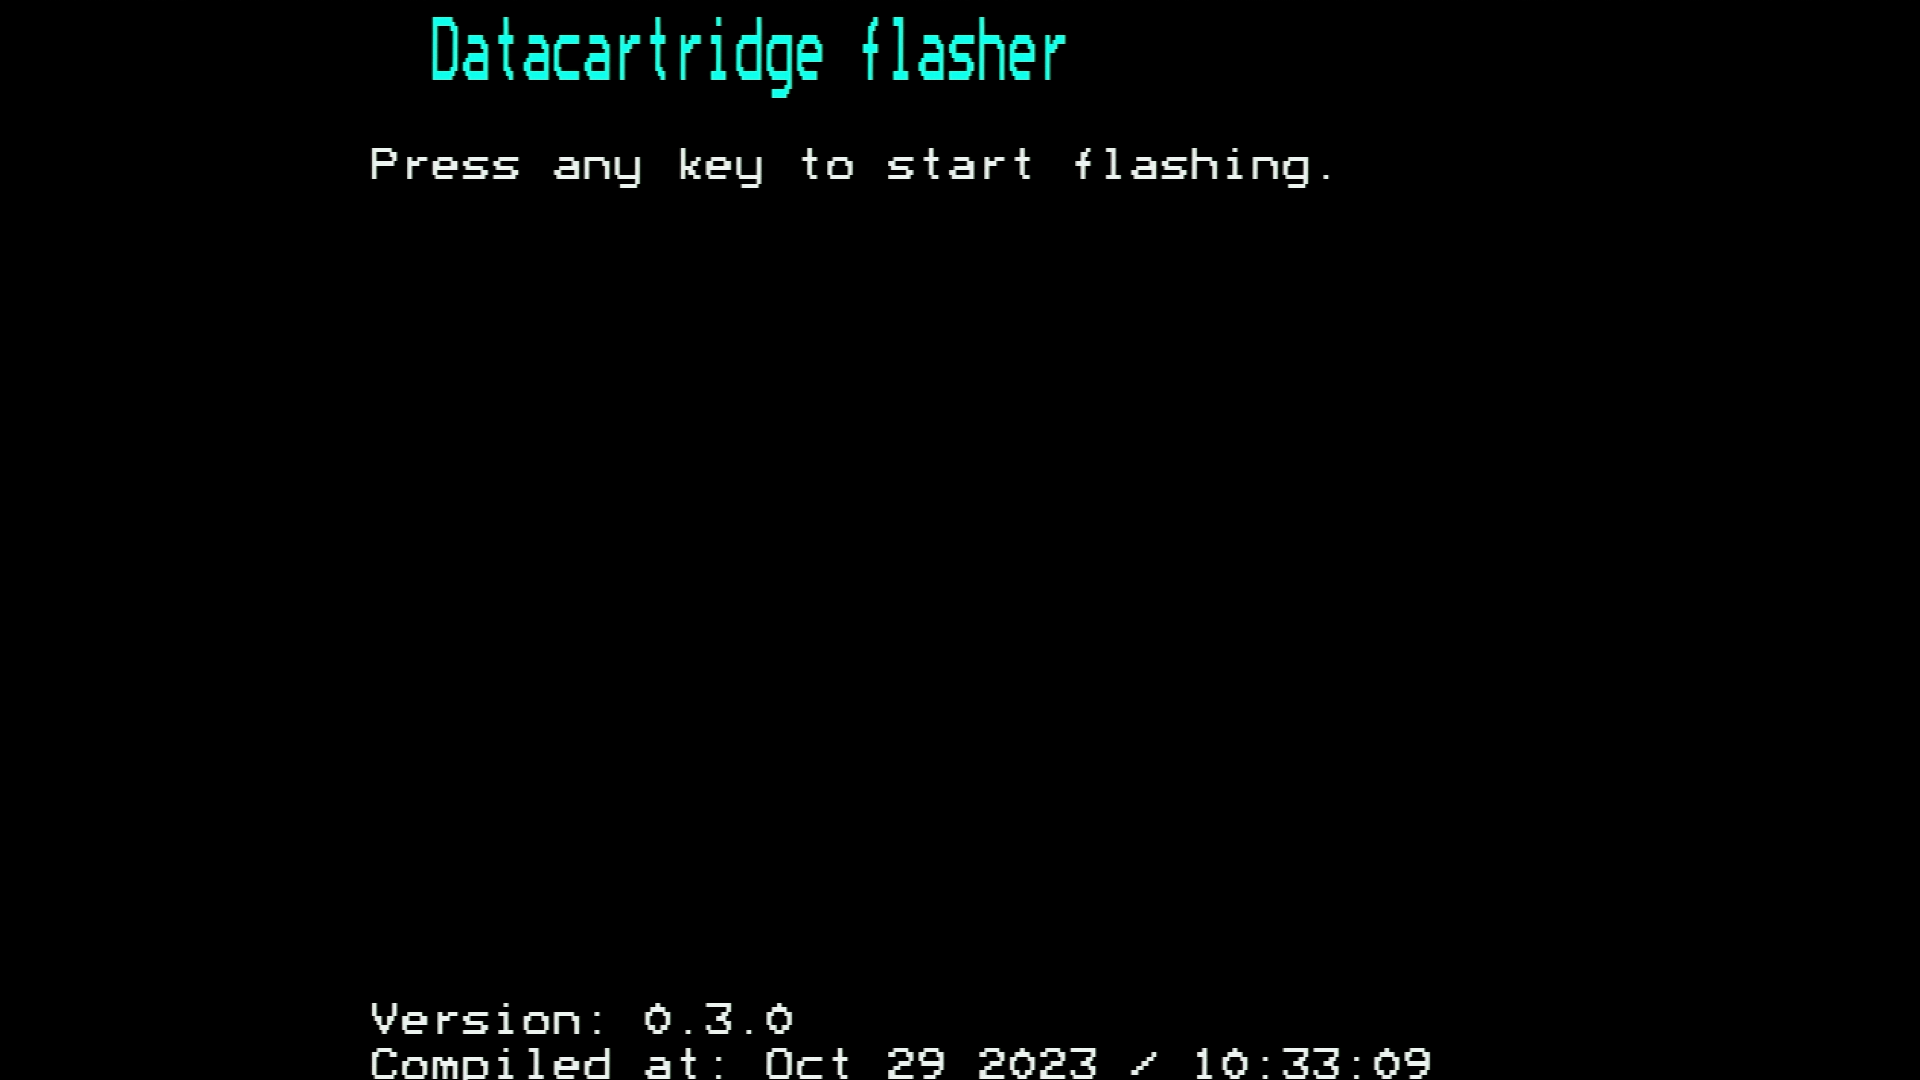 a
a
 b
b
 c
c
 d
d
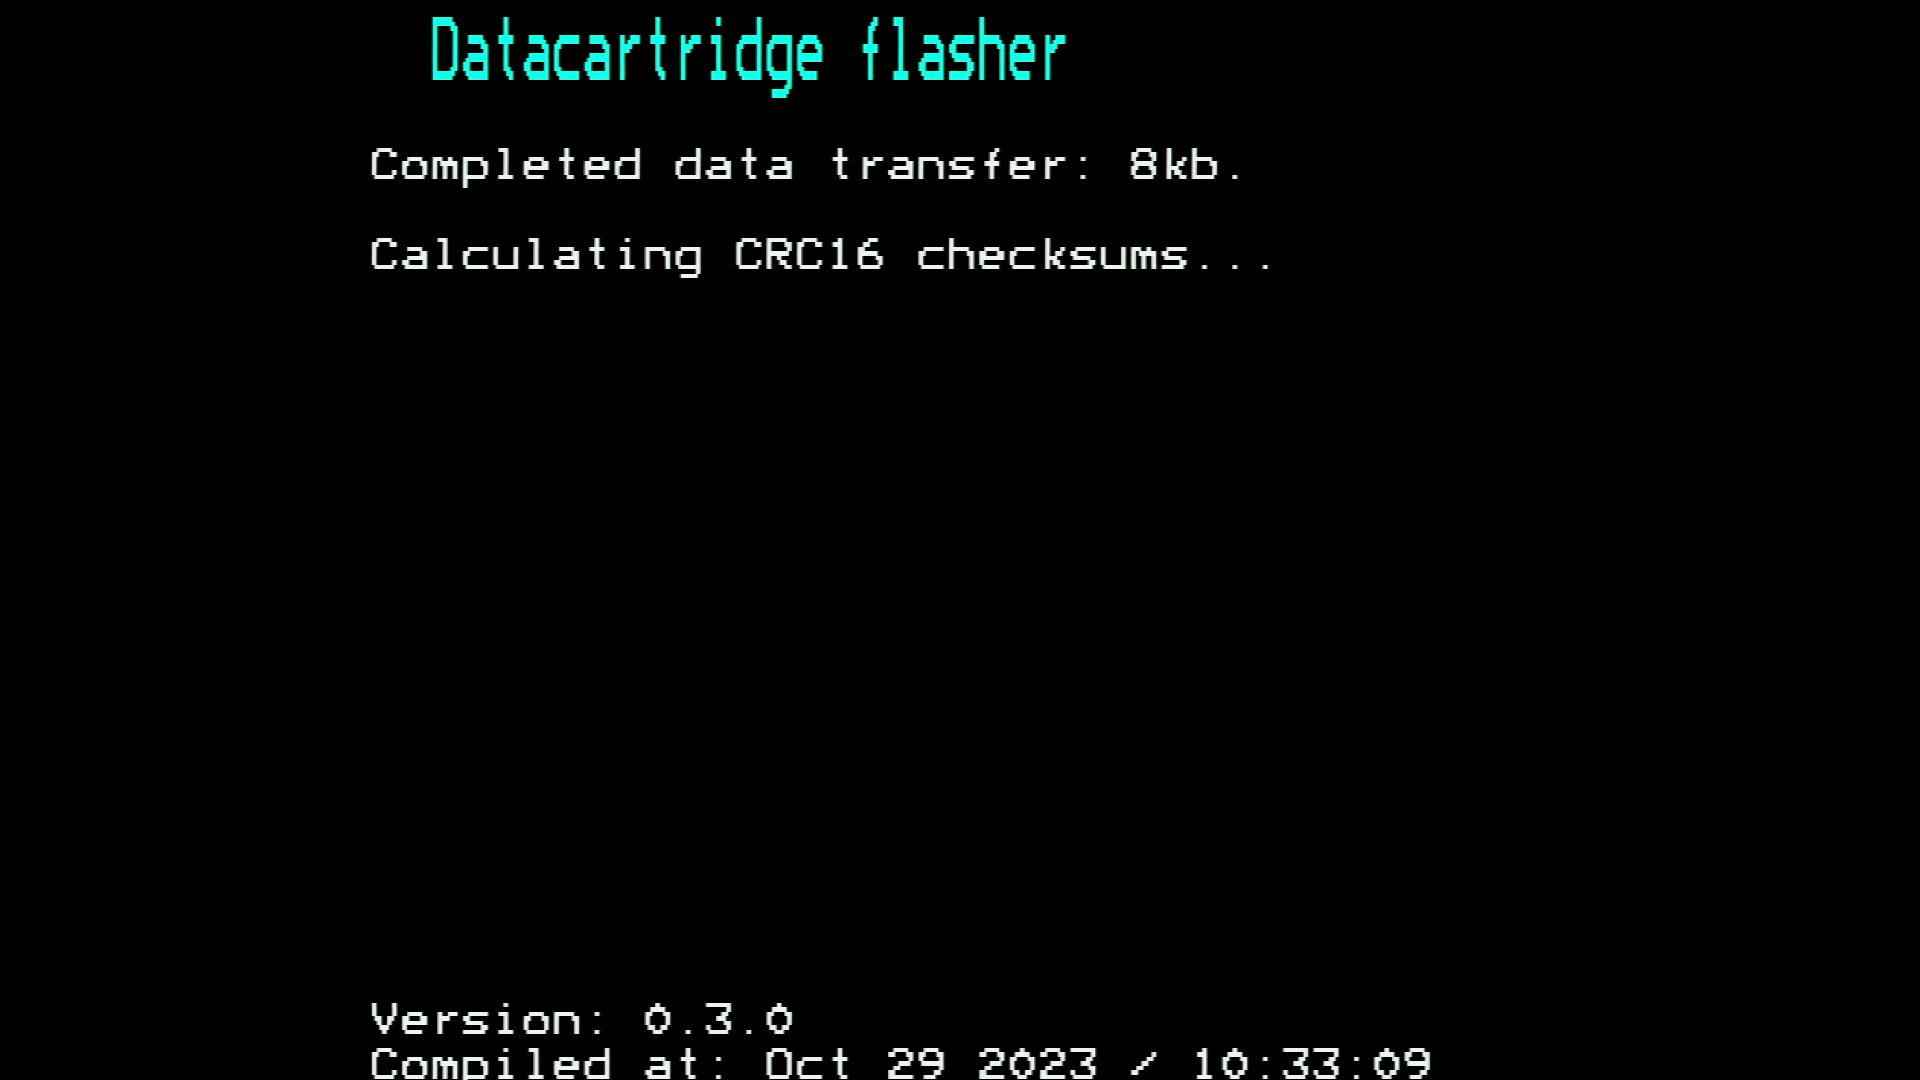
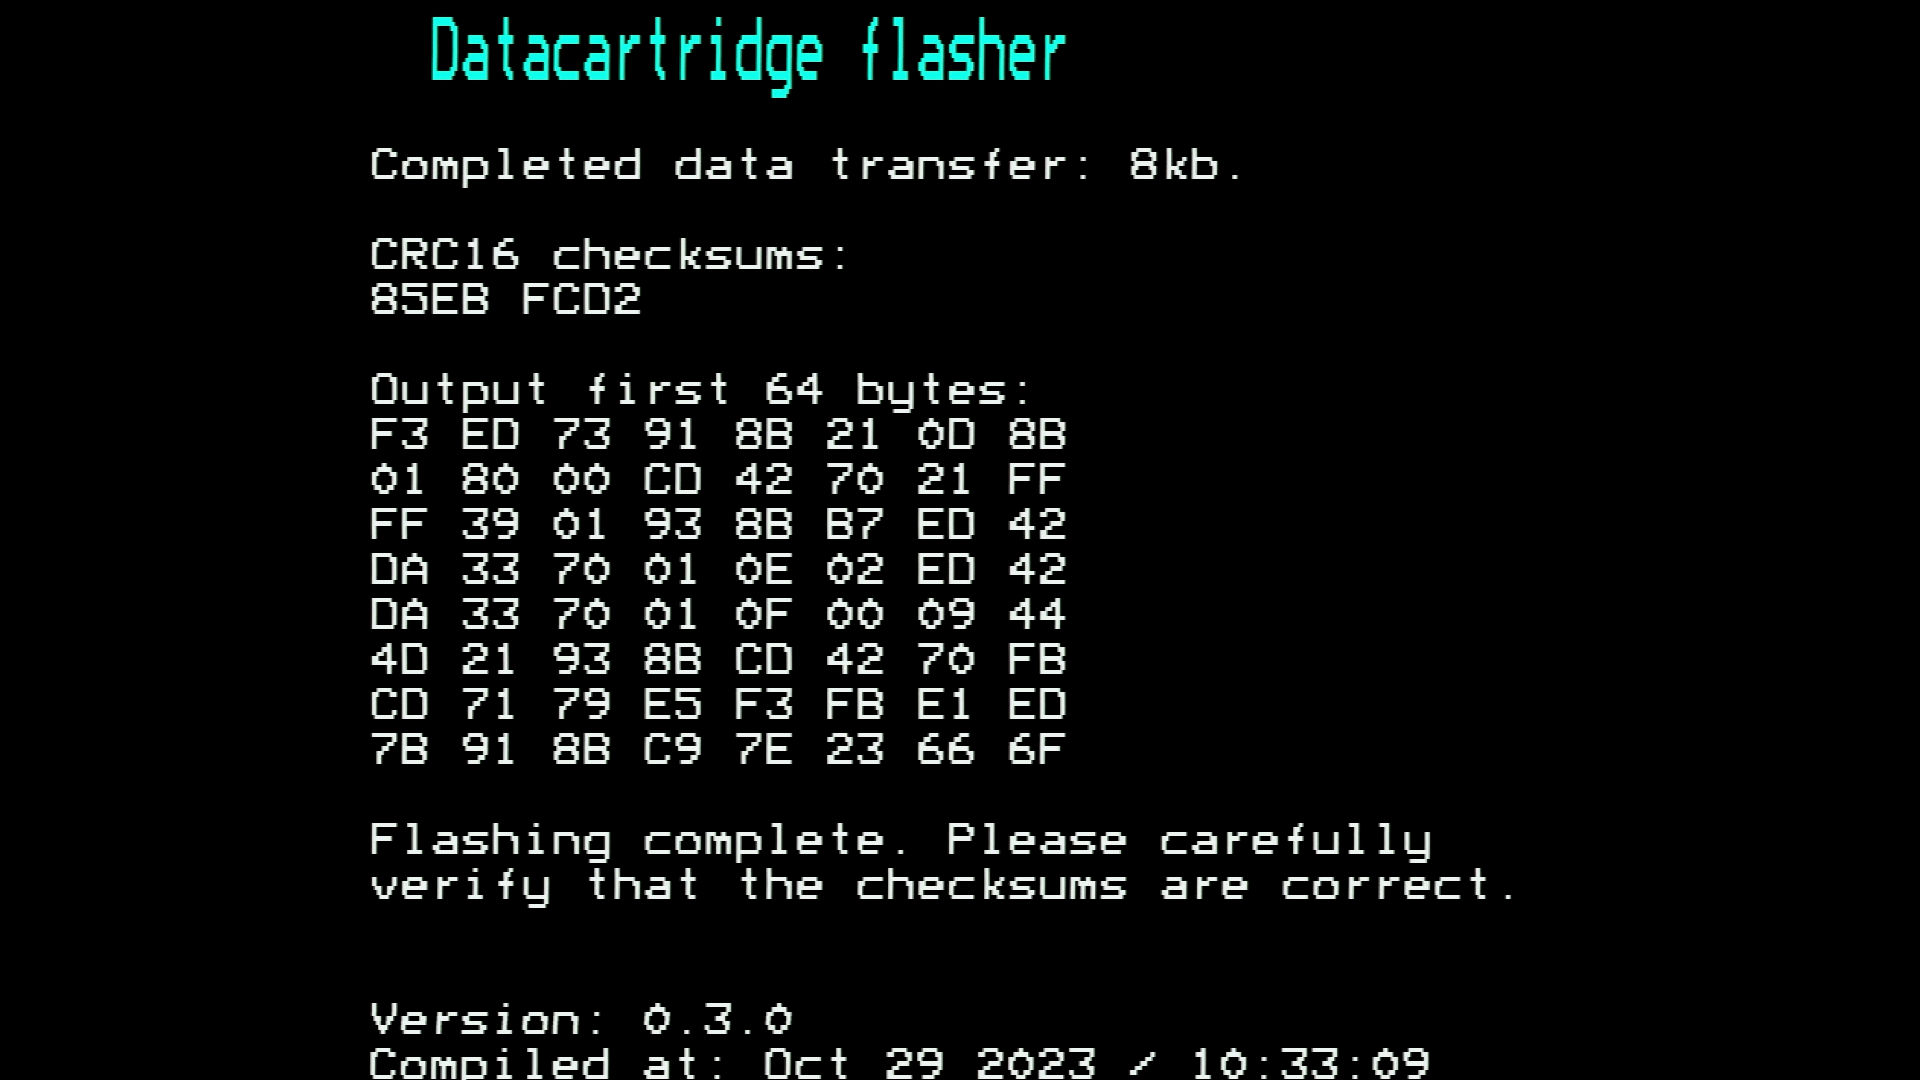
Fig. 25 (a) Initial screen upon starting the firmware-flasher; (b) Copying of the launcher from the external ROM chip to the internal ROM chip on the data cartridge; (c) Calculating the CRC16 checksums of the launcher. (d) Showing the CRC16 checksums and the first 64 bytes of the launcher. Click on any of the images to enlarge these.#
The launcher is now copied from the external ROM chip to the internal ROM chip
of the datacartridge. At the end of the copying process, the flasher
shows the two CRC16 checksums of the first 0x1000 and the second 0x1000
bytes of the launcher as well as the first 64 bytes of the program. These
results should correspond to the launcher-checksum.txt file as found on Github.
An example of this file is shown below.
Reading:  FIRMWARE.BIN
Filesize: 8192 bytes

Outputting checksums:
00: 85EB
01: FCD2

First 64 bytes:
F3 ED 73 91 8B 21 0D 8B
01 80 00 CD 42 70 21 FF
FF 39 01 93 8B B7 ED 42
DA 33 70 01 0E 02 ED 42
DA 33 70 01 0F 00 09 44
4D 21 93 8B CD 42 70 FB
CD 71 79 E5 F3 FB E1 ED
7B 91 8B C9 7E 23 66 6F
Important
Check that the CRC16 checksum matches the expected one. If not, turn off your P2000T, check that the cartridges and chips are all properly seated and try again.
Loading BASIC programs onto the datacartridge#
To load BASIC programs onto the datacartridge, we use the
P2000T FAT READER utility. This program uses the
PICO SST39SF0x0 programmer to prepare
a SST39SF0x0 chip to be used as the data carrier for the BASIC programs.
Placing BASIC programs onto a chip is fairly simple using this program. The
process is described below and shown in Figure Figure 26a.
 a
a
 b
b
 c
c
 d
d
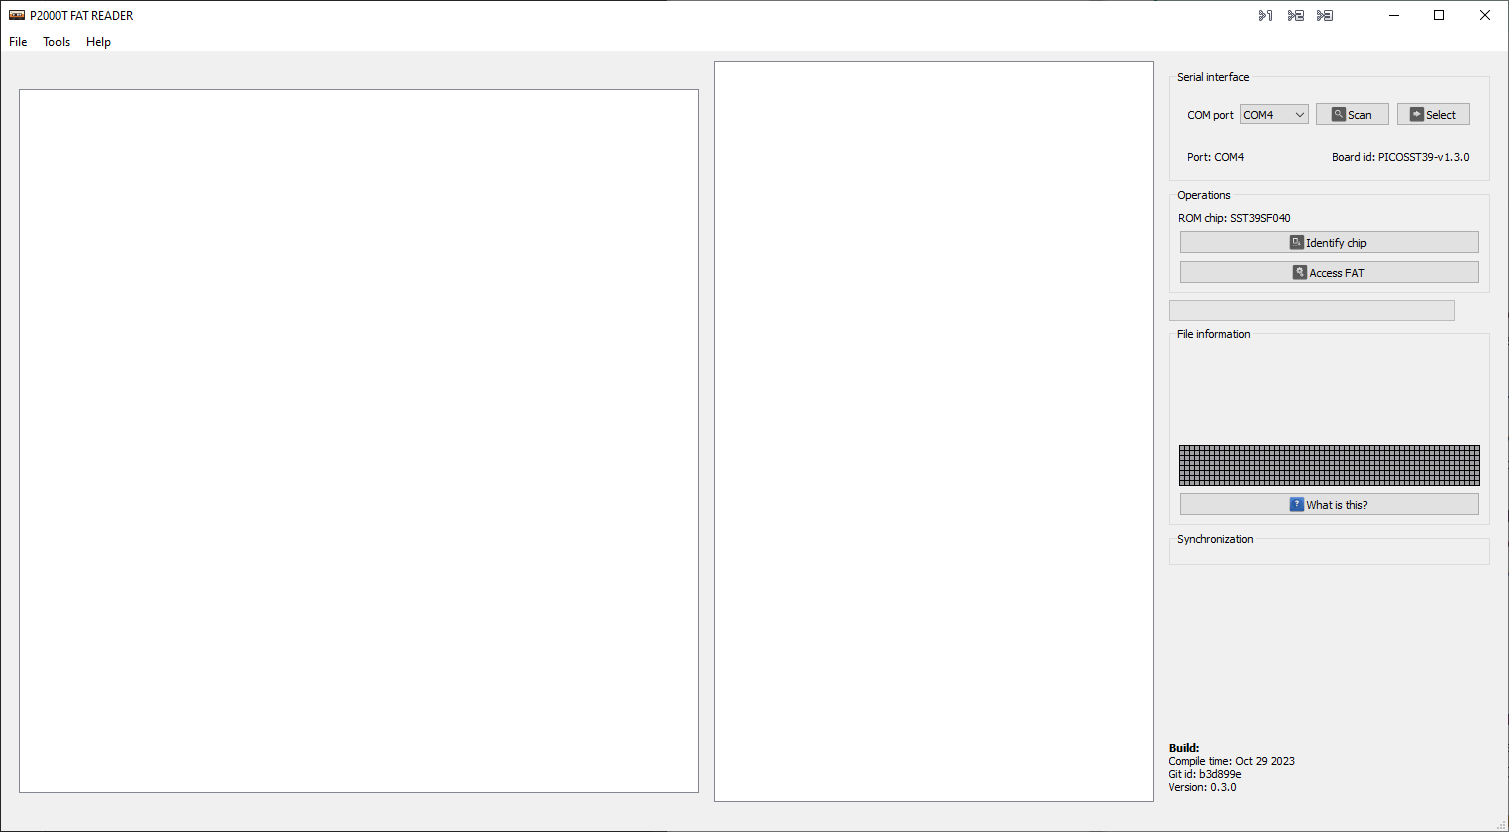
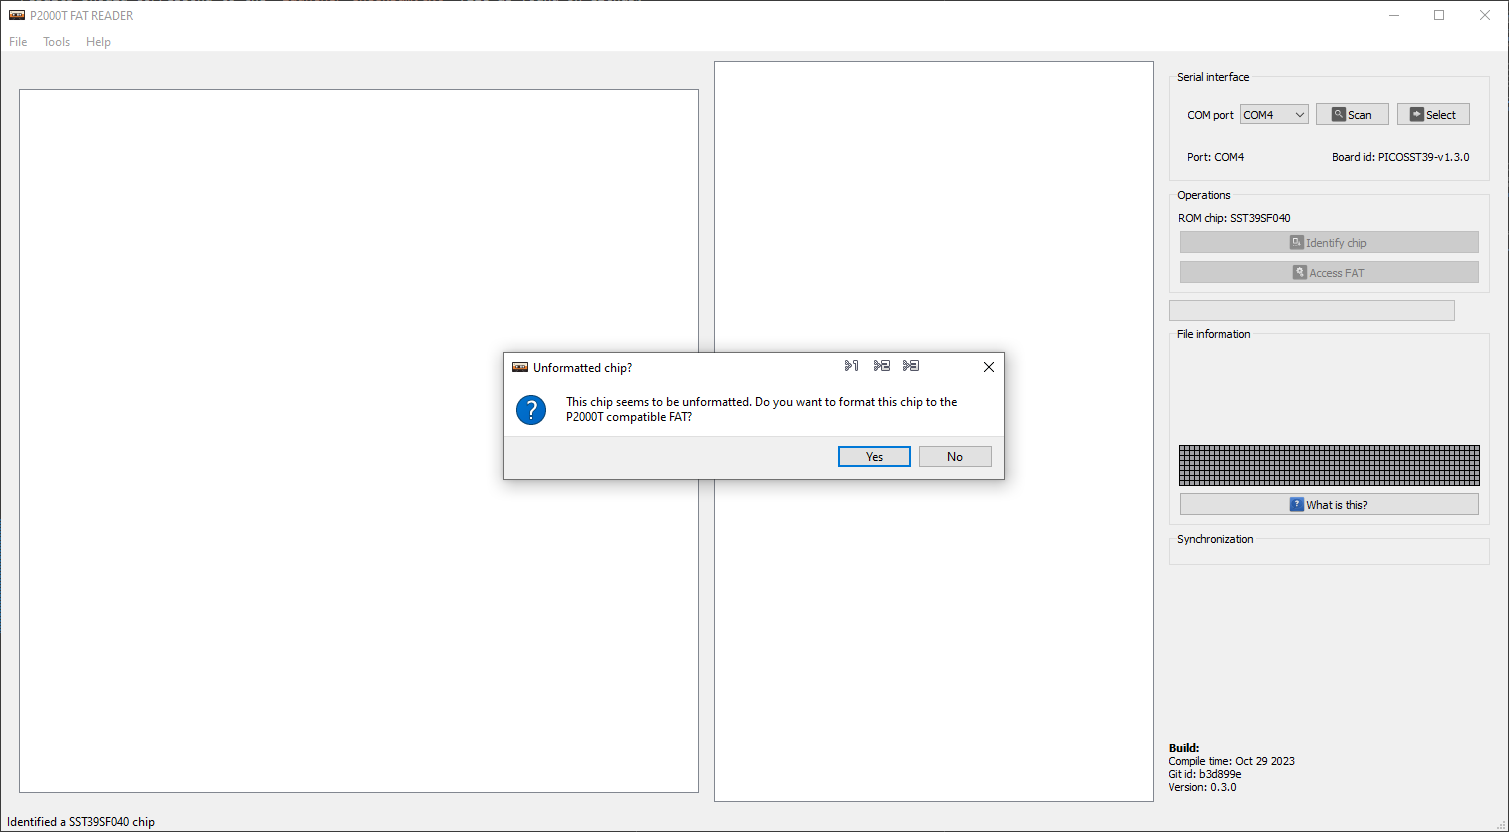
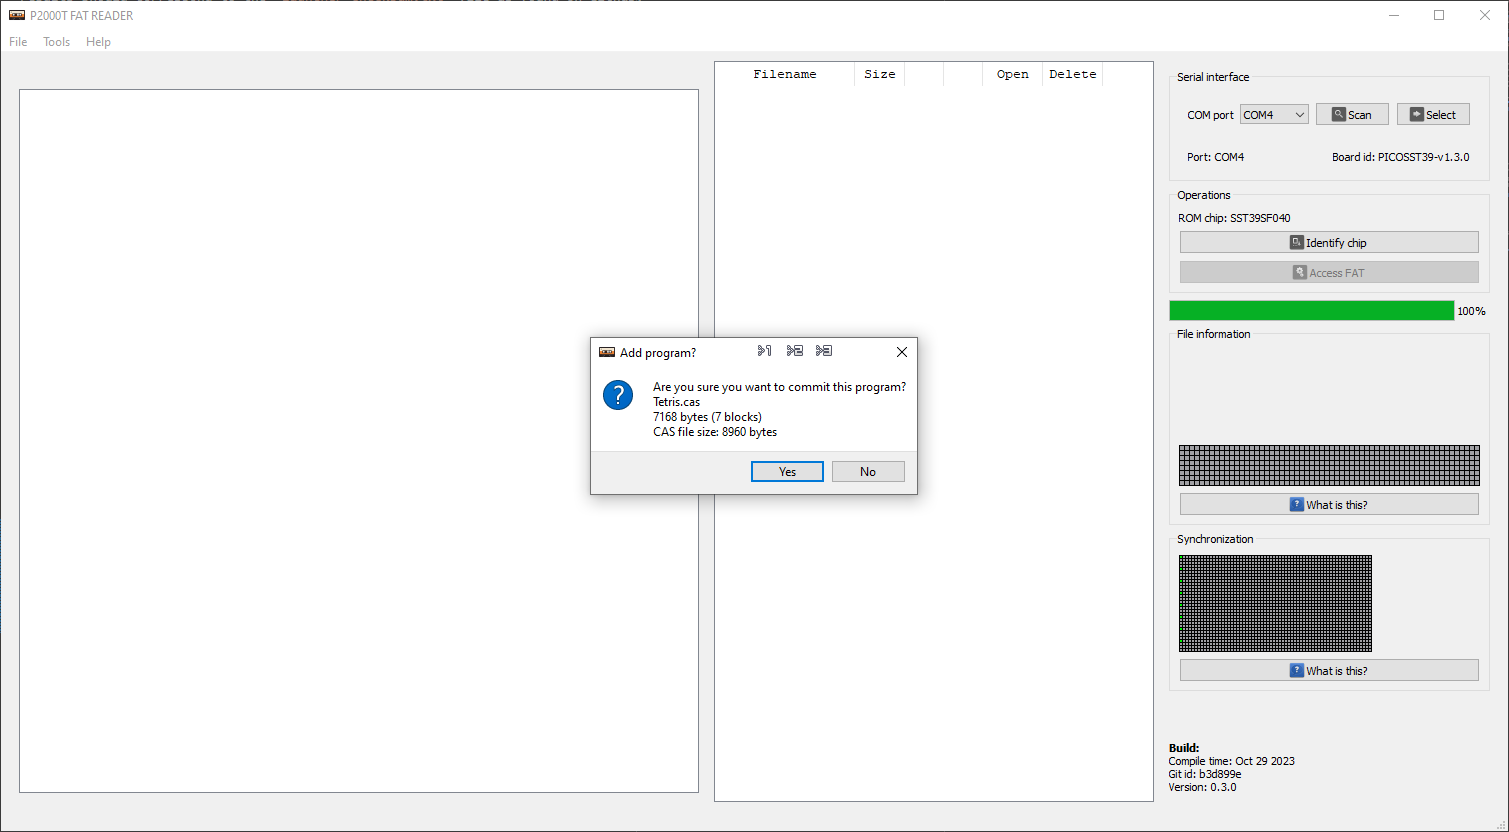
Fig. 26 (a) Opening screen of the P2000T FAT READER. (b) Query whether to format the chip. (c) Query whether to add the program. (d) Tetris.bas is written to the data cartridge.#
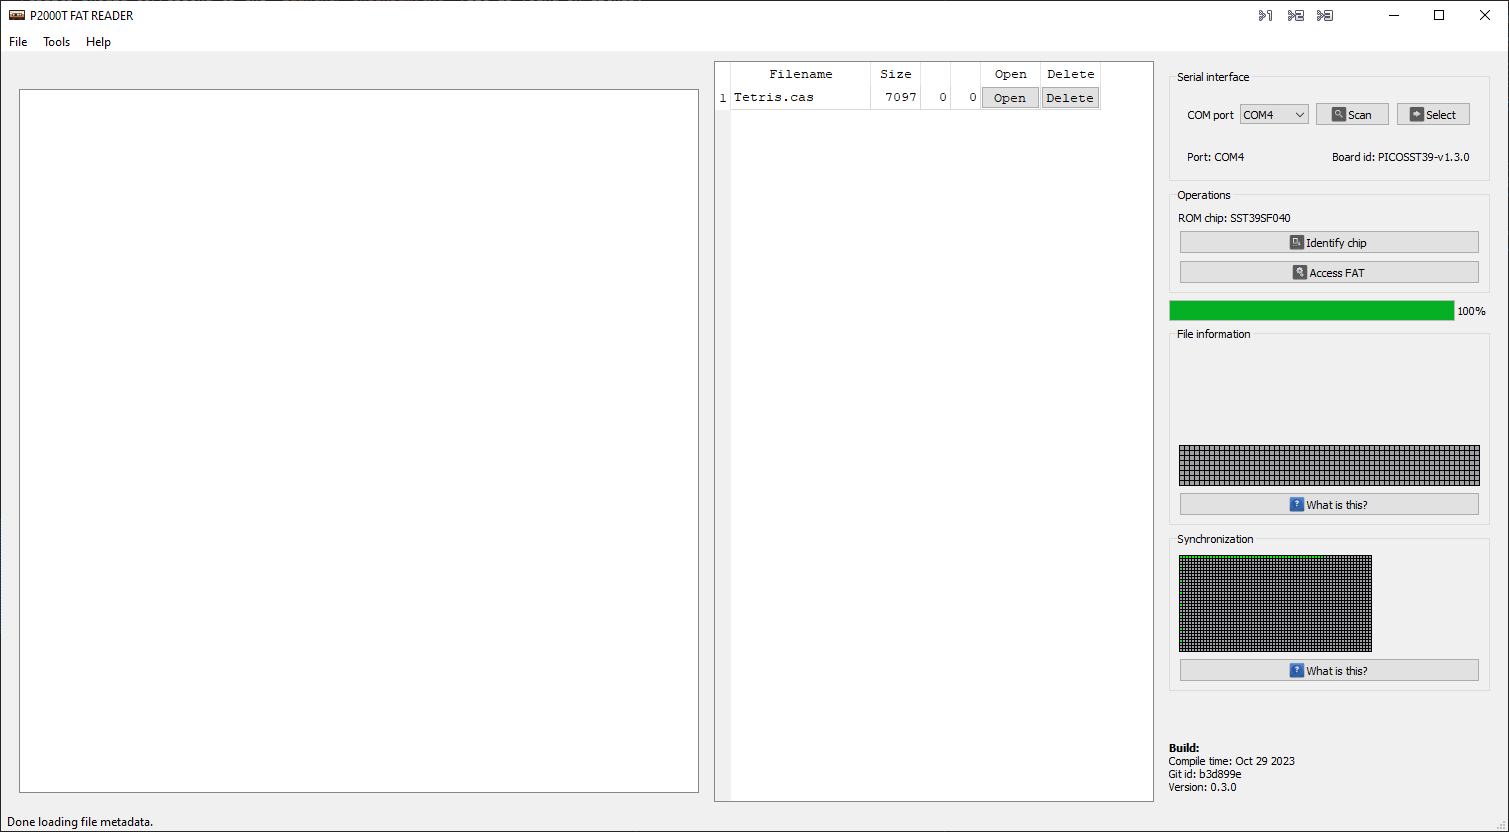
Open the program, click on the Scan button in the Serial interface group. Click on the button Identity chip, followed by clicking on the button Access FAT.
If the ROM chip has not previously been used as a storage device for the P2000T, the program will query whether to format the chip. Note that formatting the chip will erase all previous data on the chip. If this is OK, click on Yes to commence the formatting procedure. This takes a brief moment.
Once the ROM chip has been formatted, the chip is ready to store programs. To add a program, click on the drop-down menu Tools > Add program and select a CAS file from your hard drive. We have used
Tetris.casas found here. After selecting the file, the program queries whether we are sure to commit the file to the chip, to which we respond with Yes.The program is written to the chip. On the right hand side, we can see a number of green squares popping up, indicating that new data is written to the chip and is synchronized.
Hint
The P2000T Preservation Project has an excellent repository hosting many cassette programs. It is warmly recommended to use one of the programs as found there. We have used the Tetris clone as found there.
At this point, you are all done and you can test whether the data cartridge is working on your machine. Head over to the next section.
Using the datacartridge#
We assume you have followed through the contents of the other sections so far and now have the following:
A SLOT1 cartridge with the
BASICBOOTSTRAP.bin.The datacartridge with a ROM chip containing the BASIC programs inserted into the ZIF socket.
Place the SLOT1 cartridge into SLOT1 and the datacartridge into SLOT2 and turn
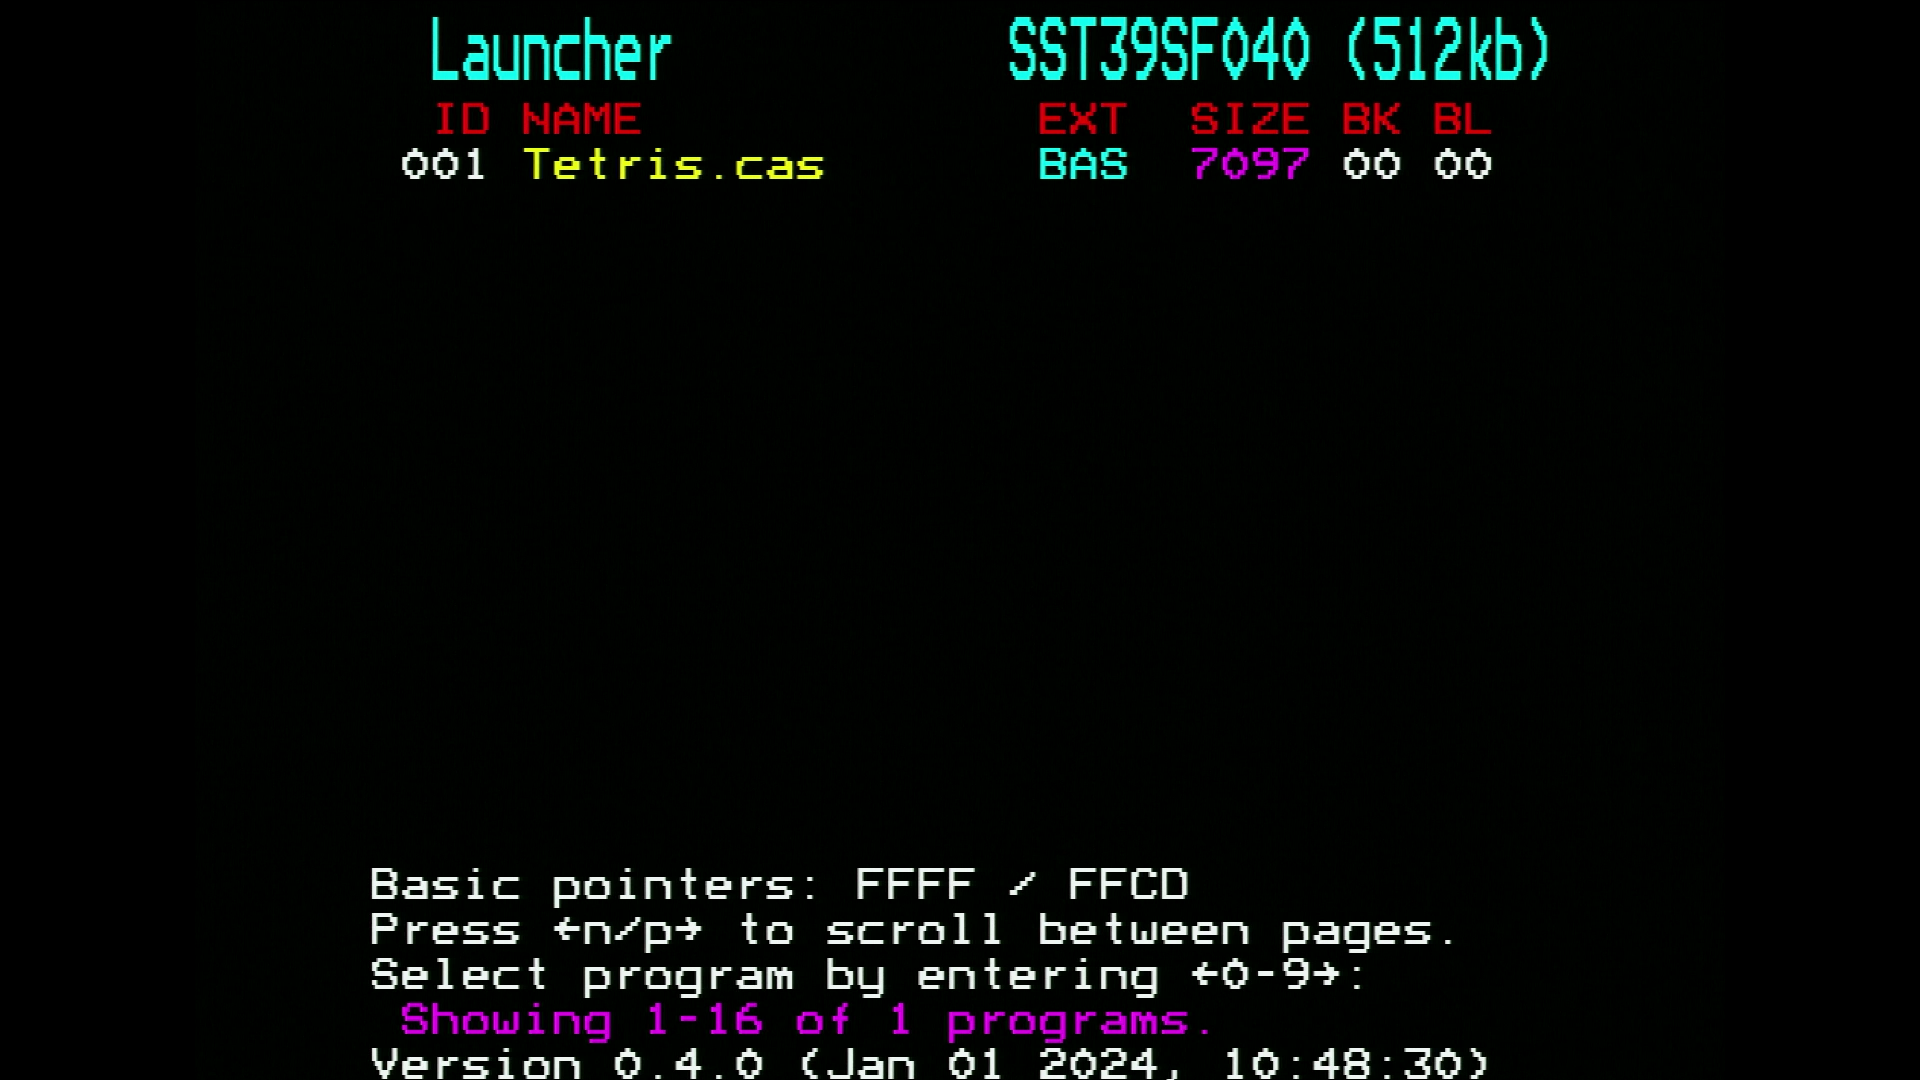
on the P2000T. You should now be greeted with a screen similar to the one as shown
in Figure 27a. In this screen, a listing of all the
programs presents on the datacartrige is shown. When there are more than 16
programs on the chip, you can scroll between the pages by hitting n and p
(for next and previous, respectively). To start a program, enter the program
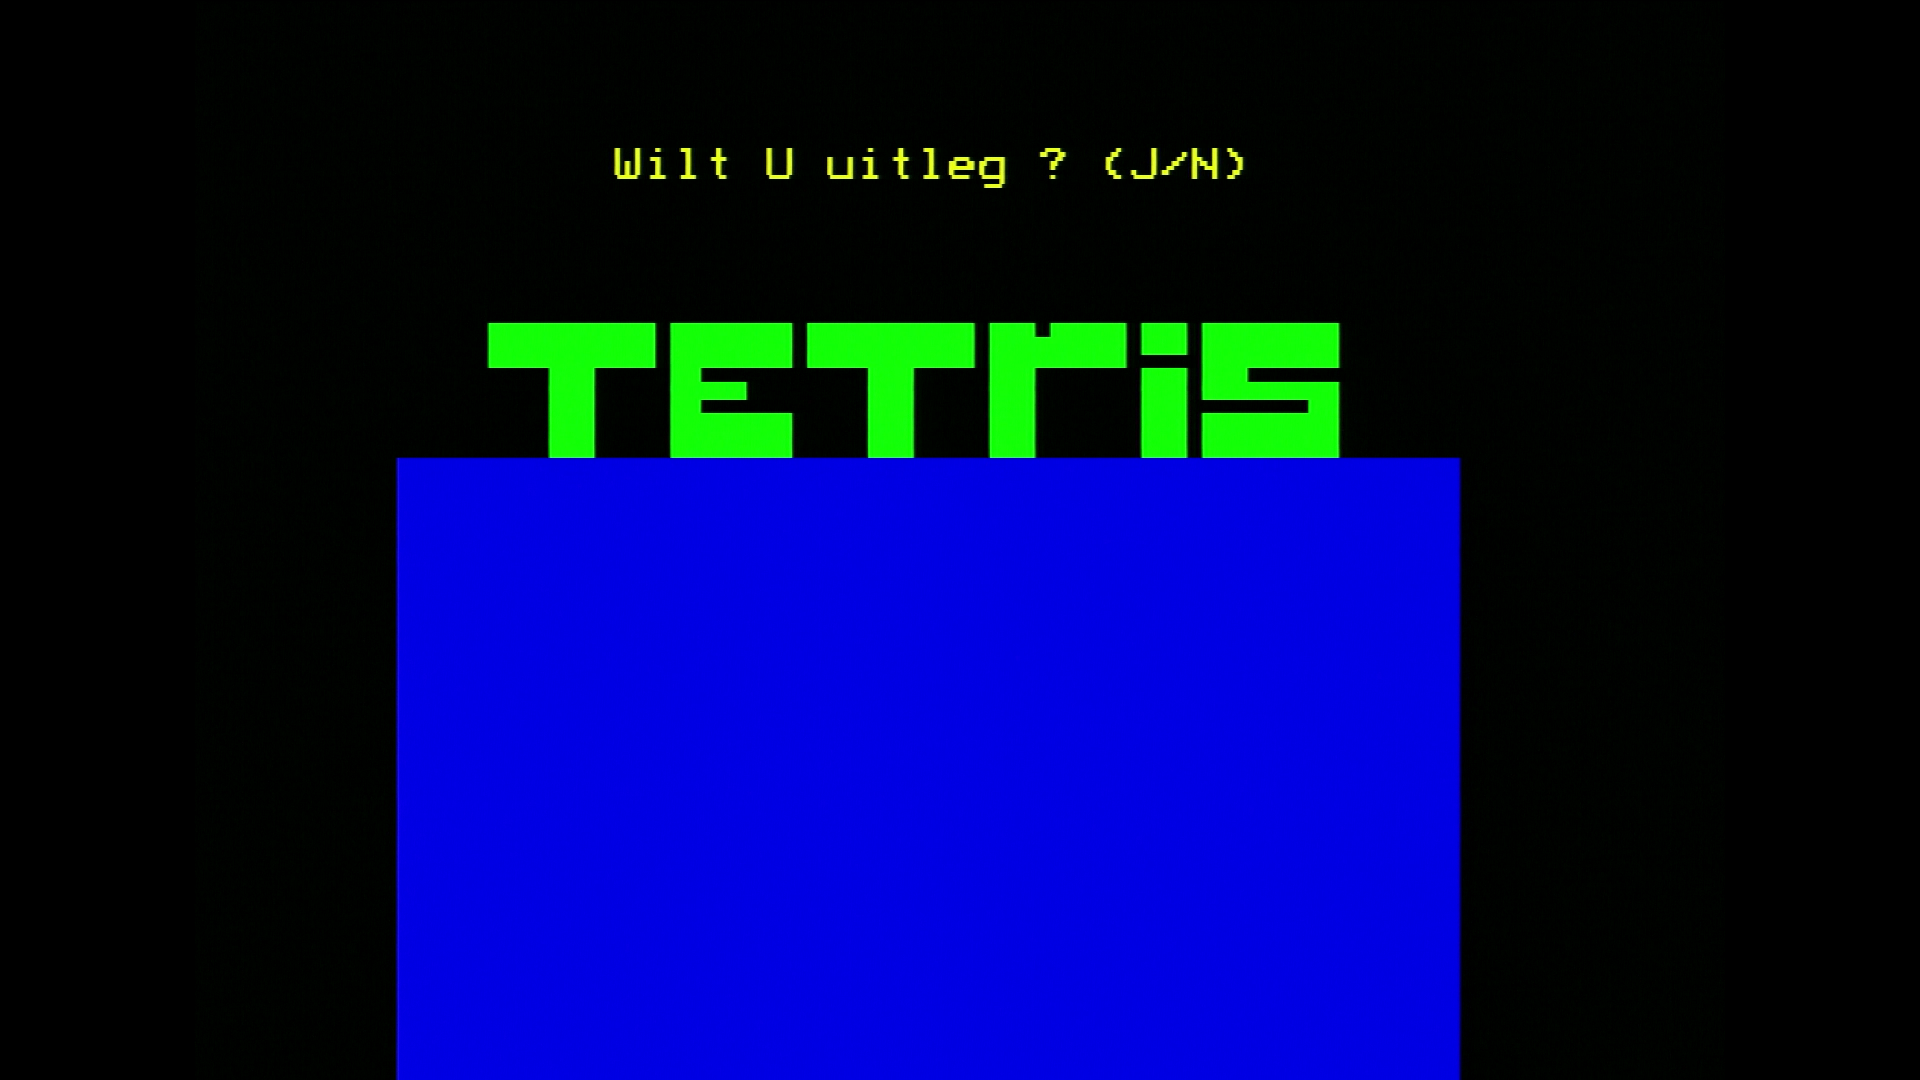
id. In this case, to start the Tetris program, we type 1 and hit enter.
The program will now load.
 a
a
 b
b
Fig. 27 (a) Listing of all the programs stored on the external chip. (b) The program “Tetris” loaded.#
Copying programs from cassette to the datacartridge#
It is also possible to transfer programs from a cassette tape to the datacartridge using the Cassette Utility. This utility is another SLOT1 program which can interface with the cassette deck, retrieve files and store them on the datacartridge. The program is fairly simplistic and it essentially scans the whole tape and copies any files it encounters. Some of these files might not be BASIC files or otherwise be undesired. One can always remove these files later on using the P2000T FAT Flasher.
To copy all files from a cassette tape to the datacartridge, prepare a
Cassette Utility SLOT1 cartridge using
CASSETTE_UTILITY.BIN.
Insert the Cassette Utility into SLOT1 and the datacartridge with an external
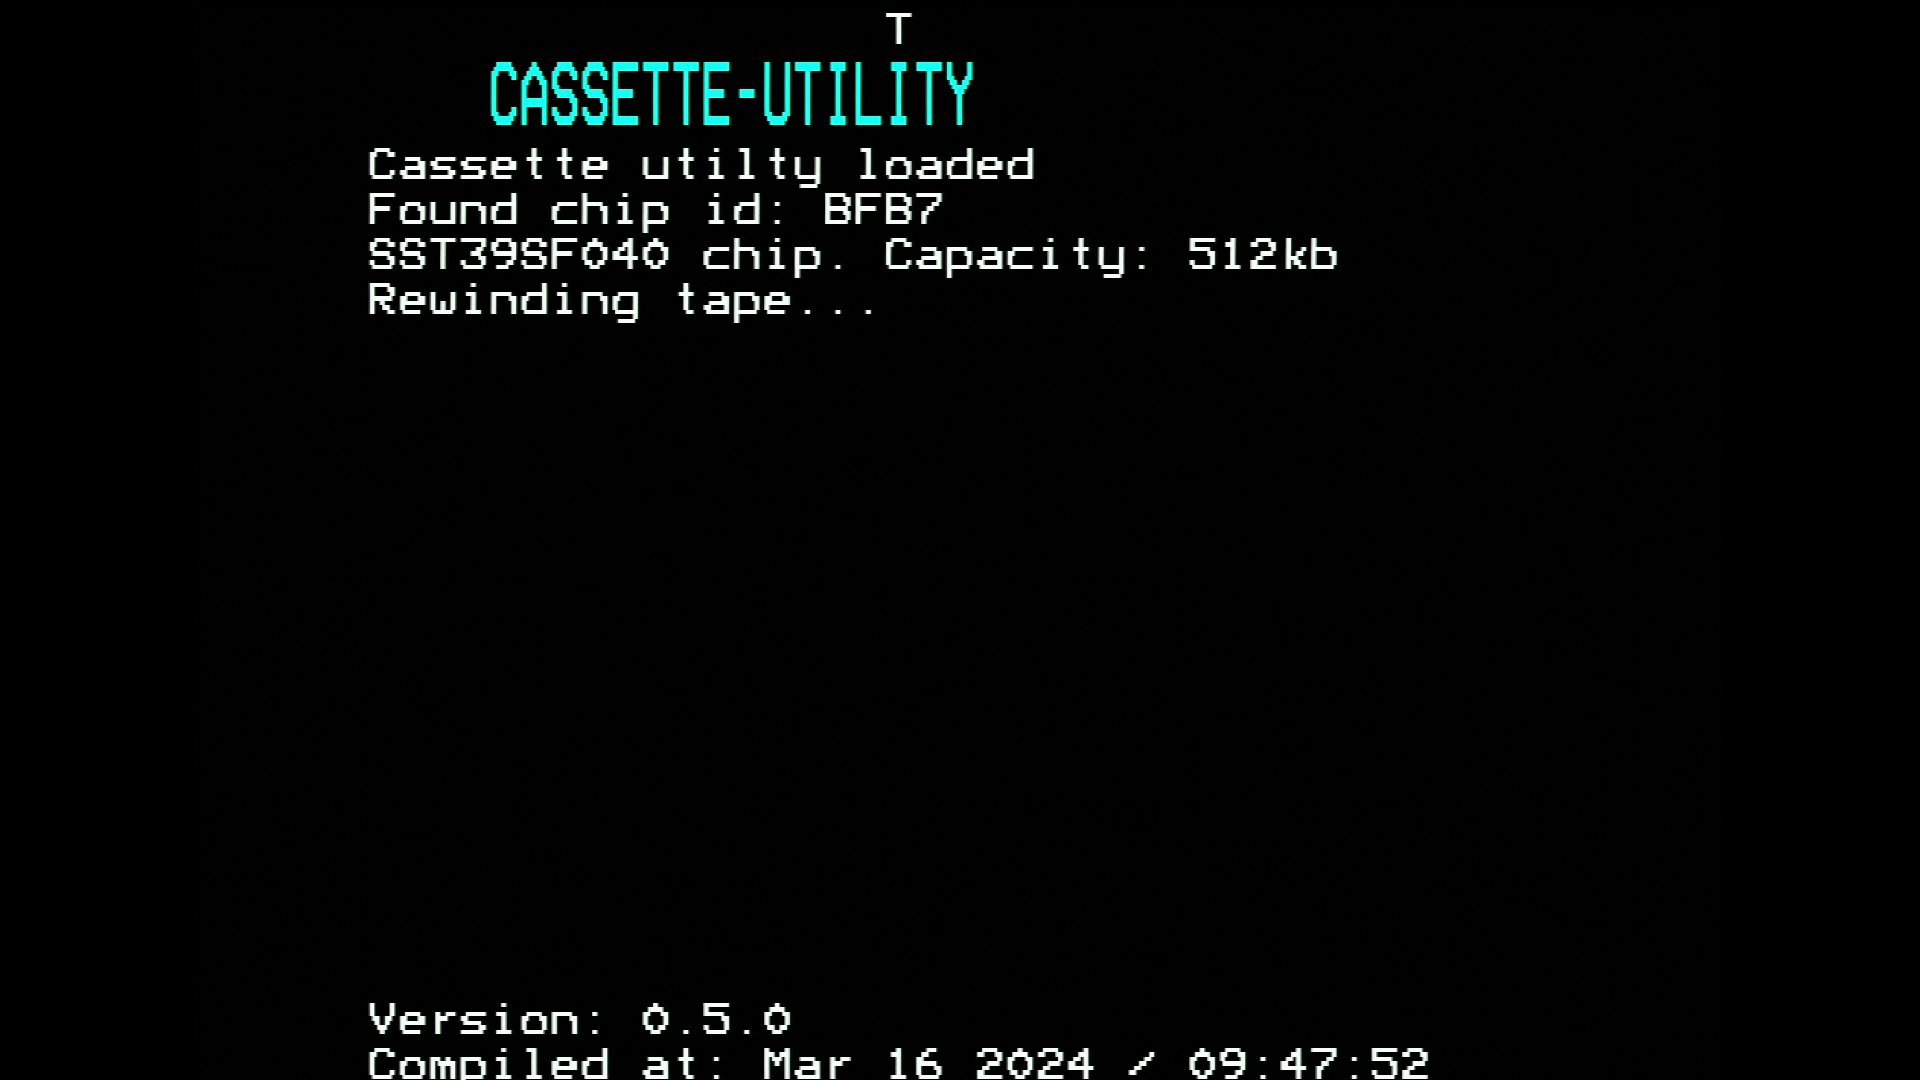
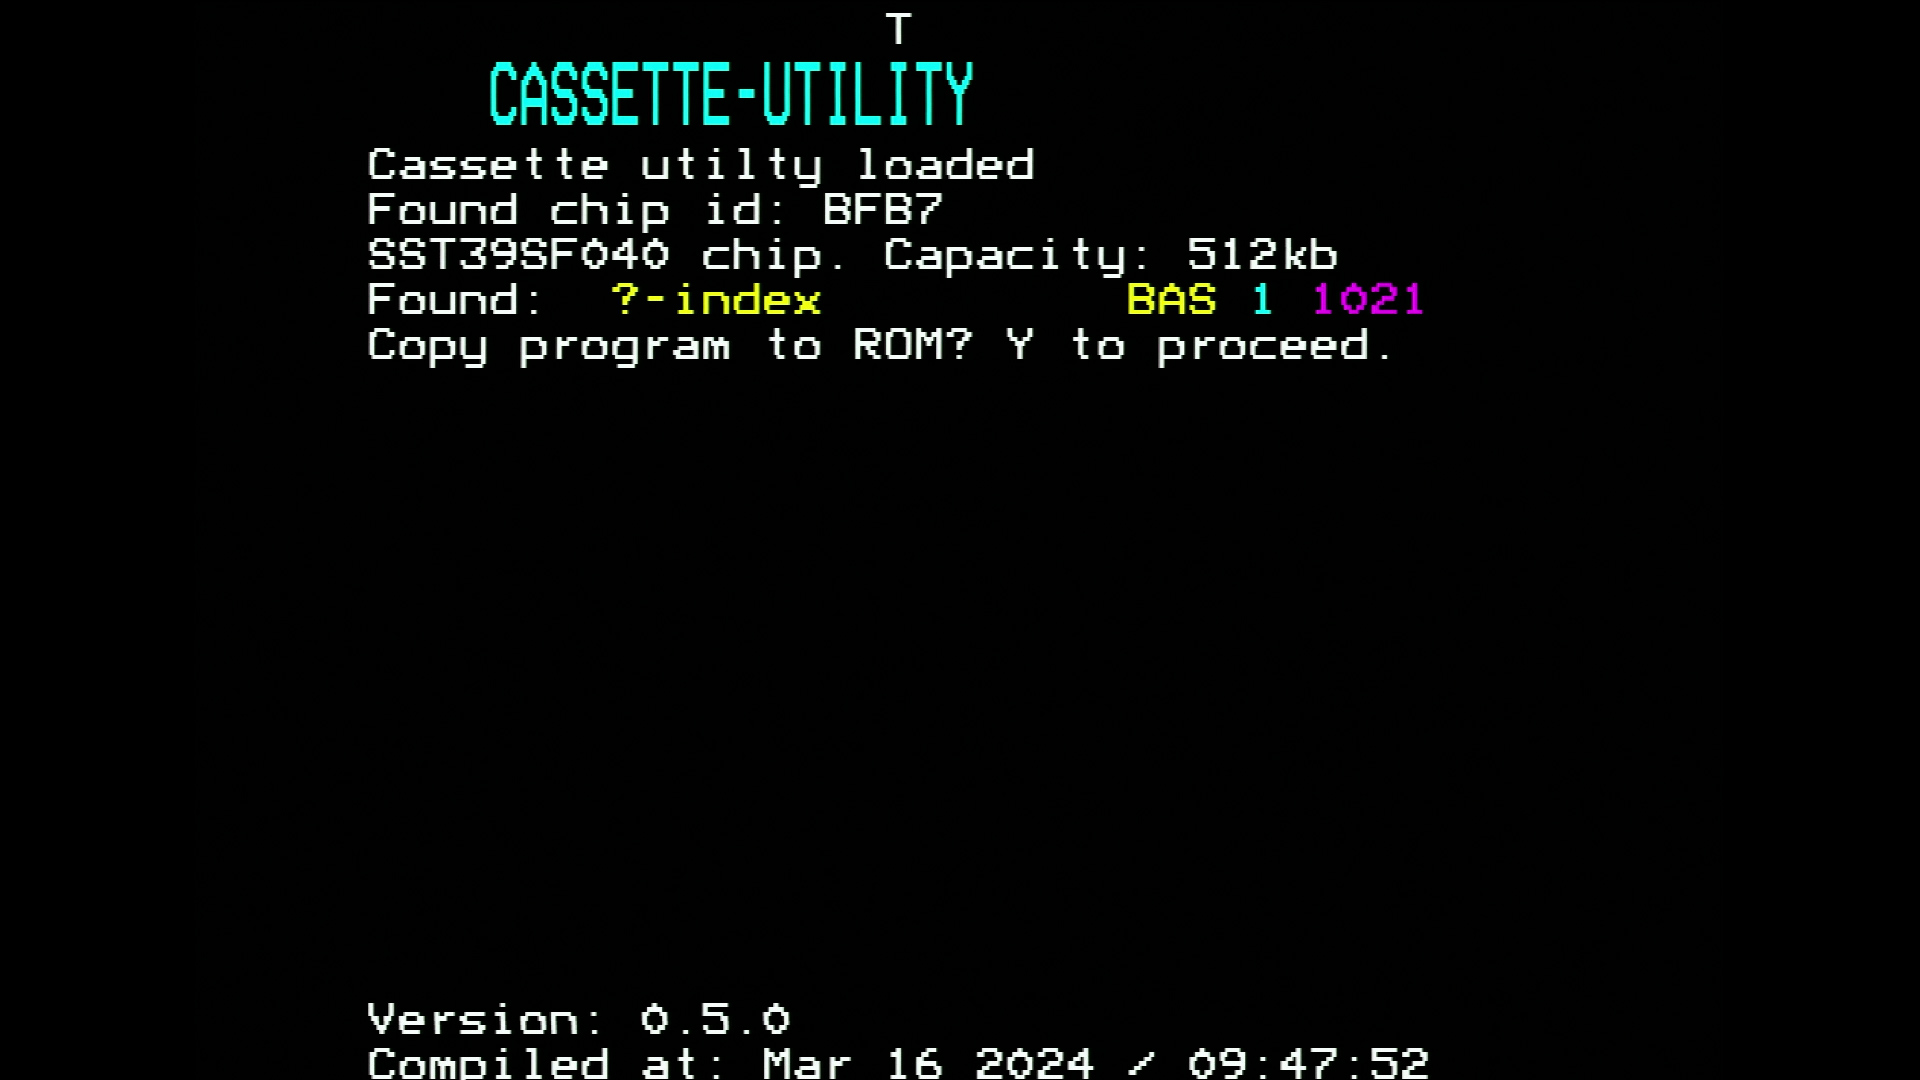
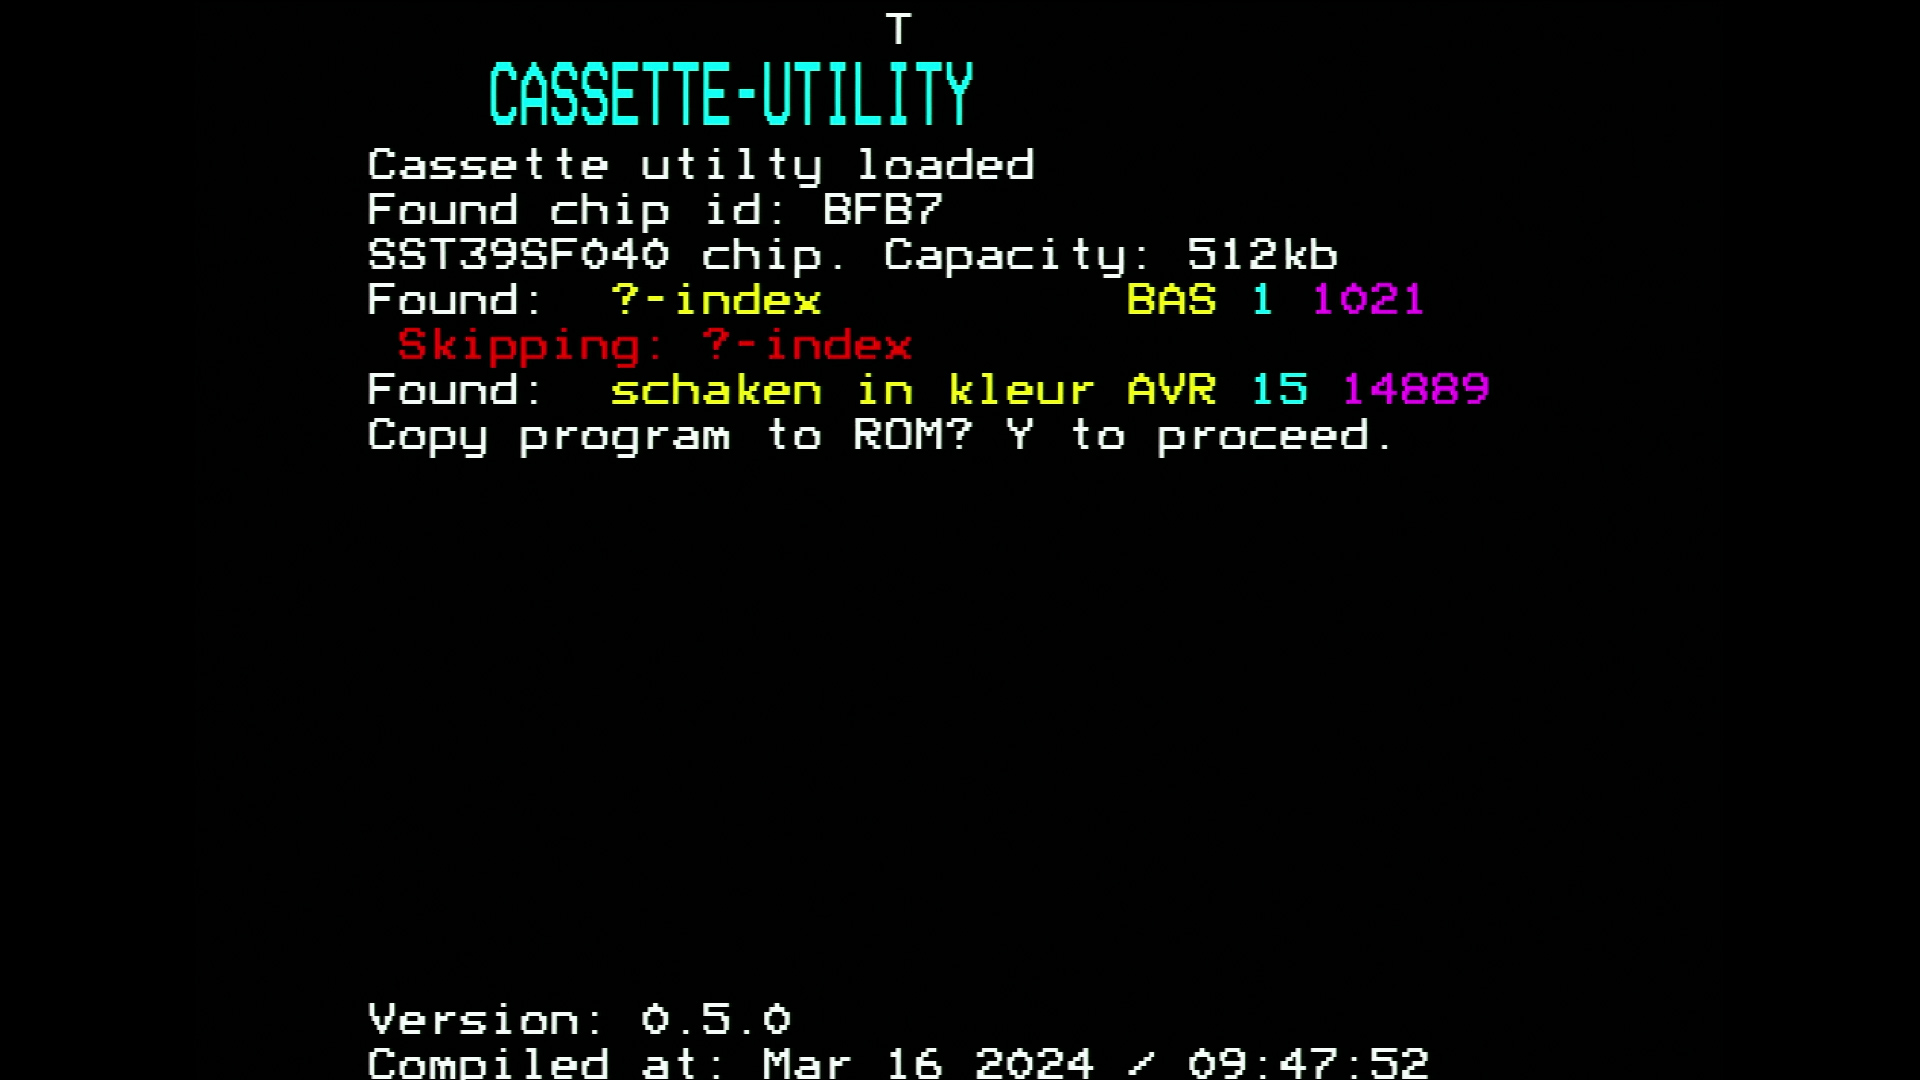
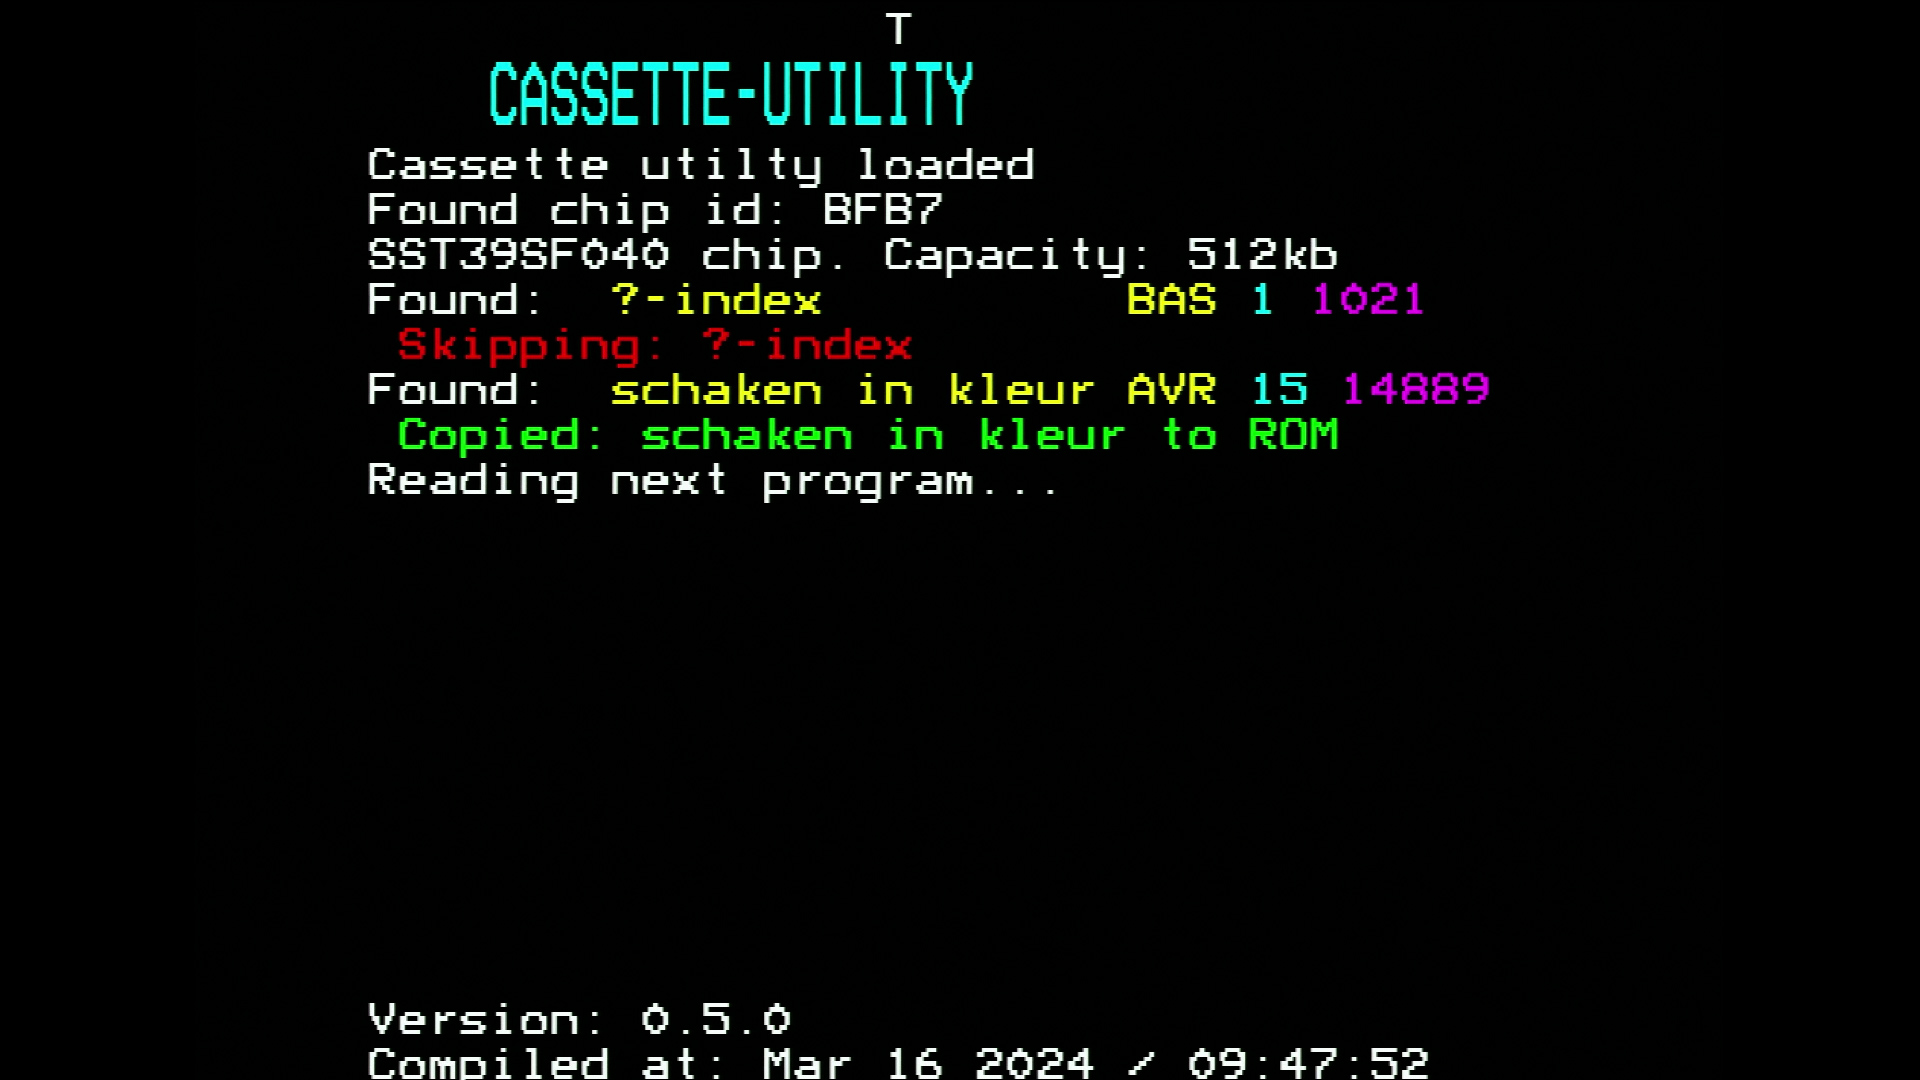
ROM in its ZIF socket into SLOT2. Open boot, you will be greeted by a screen
as shown in Figure 28a. Press any key to start the
copying process. First, the tape will rewind to its beginning. For every file
encountered, the user will be queried whether they want to store the file on
the ROM chip. Hit (Y) to do so or any other key to skip the file. A file is
composed of multiple blocks and the utility keeps on grabbing more blocks
from the tape until the file is fully read. This process will continue until
the end of the tape is encountered. At the end of the tape, the cassette utility
will yield the error code E. The user is then asked whether they want to
continue to read another tape (or go to the other side of tape).
 a
a
 b
b
 c
c
 d
d
Fig. 28 (a) Opening the Cassette Utility. The tape is rewinding. (b) The first block is read and the user is queried whether they want to store the file on the ROM. (c) The user has pressed a different key than ‘Y’ by which the file is skipped. The user is now queried whether they want to store the next program. (d) The user has accepted to store this file and this program has been successfully copied to the ROM.#
Note
The cassette utility is still in its infancy and it is expected that newer versions of the utility will have more features. Keep an eye out on this page and/or the Github on the most recent version.
After transferring the files from the cassette tape to the datacrtridge, we can take the ROM chip from the ZIF socket and insert it into the PICO SST39SF0x0 Programmer and use the P2000T FAT Flasher to observe the new programs that have been transferred. As can be seen in Figure 29a, the ROM chip now hosts the additional programs that were transferred from the cassette tape.
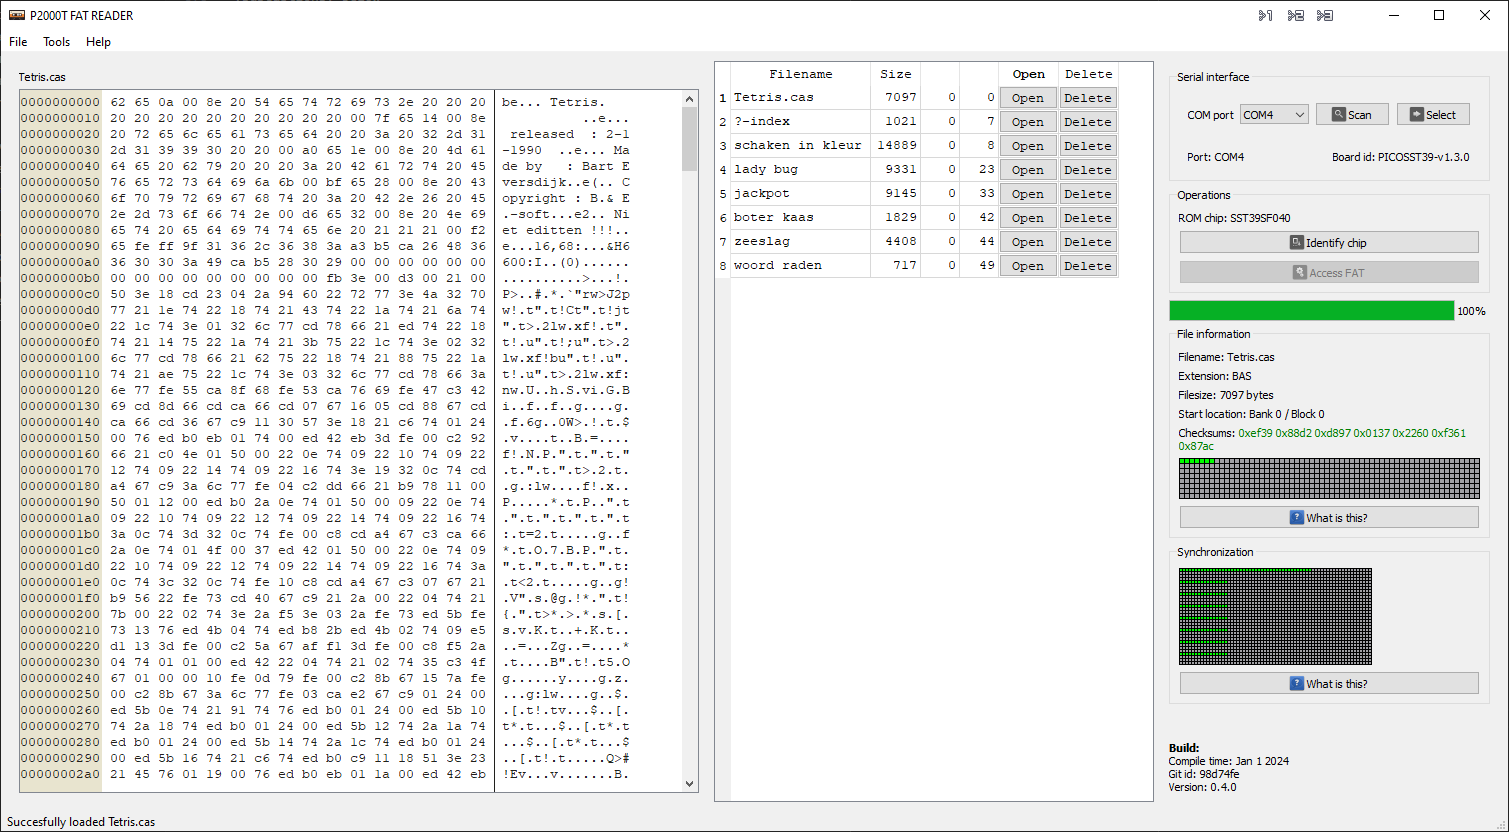
Fig. 29 Reading the ROM chip after reading the cassette tape using the P2000T FAT Flasher.#
We can use the P2000T FAT Flasher to open these programs in the emulator
using the Open button or delete any of the programs using the Delete button.
Looking at the list as shown in Figure 29a, it would
make sense to delete the ?-index program as this is not a BASIC program but
merely an index file.